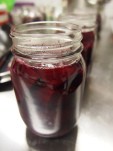
Last week we had a lot of fun canning with Veith House. When chatting with Veith House about what to make, we agreed that the recipe needed to be affordable and easy. Pickled beets fit that bill. Beets are available year round, most recipes don’t require a lot of ingredients, and they can add a surprising amount of flavor to meals (sprinkled over a salad, or as a topping on a burger? Yes please!). The following recipe is intended for storing pickled beets for up to one year without refrigeration (until opened). You can also download the following resource: Canning 101 – Pickled Beets
Tip: Try swapping white vinegar with apple cider vinegar, and sugar with honey. If you don’t want to go through the full water bath canning process (instructions below), you can use less sugar but they will need to be refrigerated immediately and will only last for a couple months versus one year.
*Adapted from The Complete Book of Pickling by Jennifer Mackenzie
INGREDIENTS (for 7 X 500ml jars)
- 6lbs beets
- 1 1/3 cups sugar
- 2 tsp pickling or canning salt
- 4 cups white vinegar
- 2 cups water
DIRECTIONS
- Trim the end of beets and place in large pot with water
- Bring water to boil, and reduce heat and boil for 40 minutes or until tender, but not too soft (fork can poke through)
- In the meantime, prepare canner, jars and lids (sterilize)
- Place beets in bowl with cold water and let cool off for approx. 30 minutes
- Peel skins – they should slide off easily once cooled, and chop into byte size pieces.
- In a large pot, combine vinegar, salt, sugar, and water and bring to a boil over medium/high heat. Stir often until sugar has dissolved.
- Add beets and return to a boil for one minute –then remove from heat
- Pack beets into jars, leaving about 1 inch (2.5 cm) head space.
- Pour hot pickling liquid and remove air bubbles
- Wipe rim with clean dish cloth and white vinegar or paper towel.
- Place lid on jar. Screw to fingertip tight
- Place jars in canner (or hot water bath) and return to a boil
- Process in hot water bath for 30 minutes
- Remove from canner and let stand for 24 hours. You should hear a ‘pop’ shortly after they are removed. This with a visual check that the seal is curved downward confirms a good seal.
Canning 101: the basics of home canning
In home canning, heat is applied to jars of food interrupting the natural decaying process and killing the microorganisms that cause food to spoil. The process also forces the air out of the jars, forming a vacuum seal that prevents any air or microorganisms from entering the jar, and allows the jars of food to be stored at room temperature for an extended period of time.
A Few Warnings: Hot water bath canning is safe for high acid foods such as fruit, pickles, chutney, jam, salsa and tomatoes with added acid (lemon juice). It is not safe for low acid foods such as vegetables and meats without additional acid. Always follow a recipe and use the jar size indicated in your recipe as this relates to the necessary processing time.
Necessary Tools: canner (or large, deep pot), a rack (optional but helpful), jars and two-piece metal lids, tongs, a rubber spatula, a ladle and a wide-mouth funnel.
Home Canning Steps
- Wash and prepare your produce.
- Wash jars with hot, soapy water and rinse well. Place jars in the canner (or large, deep pot) with enough water to cover them. Bring to a boil. Boil for 10 minutes, sterilizing the jars. Leave the jars in the canner until you are ready to fill them.
- Place the snap lids in a small bowl or pot and pour very hot water over them. Allow them to sit a few minutes in the water to soften until you are ready to use them.
- Prepare your recipe. Fill your jars (with the help of the funnel and ladle) with your recipe. Follow your recipe regarding how much “headspace” to leave. The general rule is: ¼ inch for 125mL and 250mL jars and ½ inch for 500mL and 1L jars.
- Remove any air bubbles in the jar by running the rubber spatula along the inside wall of each jar.
- Wipe the rim of the jar to remove any food spills. Place the snap lid and metal screw band on the jar, tightening gently. Repeat for each jar.
- Now you are ready to “process” the jars in the hot water bath. Place the filled jars into the canner of boiling water. Begin timing, following your recipe regarding necessary processing time. Ensure that the water covers the jars by a minimum of 1inch.
- When your processing time is up, remove the lid and remove the jars from the canner without tilting. Do not tighten the screw bands or move the jars for a number of hours. You will likely hear a popping sound when the seal forms. You can test the seals by checking that the centre of the snap lid curves downward. Store your jars in a cool, dark place.
Additional Resources:
Book: The Complete Book of Pickling by Jennifer Mackenzie
National Centre for Home Food Preservation: http://nchfp.uga.edu/how/can6b_pickle.html
Enjoy!
Jen Organ, Community Food Programmer with The Our Food Project, Ecology Action Centre

