
Raise your hand if you ever forget about those veggies in your fridge and before you know it things are a little too wilted, or worse – no longer good to eat (mine’s up). Usually around this time of year gardens are overflowing with beans, tomatoes, and many other crops that can be overwhelming to use as fast as things ripen. Freezing is one of the quickest ways to save fresh foods from going to waste. If you are lucky to have large freezer space, it can also be an affordable option for preserving bulk produce to last you throughout the winter. Last week at Bayers Westwood Family Resource Centre we experimented with a few different freezing techniques with beans and herbs harvested mostly from the Bayers Westwood and HUGS community garden where some participants have plots. The frozen herbs were left at the Bayers Westwood freezer for use in a future cooking workshop this fall or winter. We’ll let you know how they taste!
Blanching:
Some veggies are fine to throw in the freezer as is and their flavour will be well preserved (e.g., peppers and tomatoes). For other veggies like beans, corn, peas, and squash it is recommended to blanch before freezing. Blanching is the term used for pre-cooking (or par-boiling) produce for a short period of time before freezing. Without getting too complicated, some veggies have enzymes in them that when frozen cause veggies to lose their flavour. Blanching these veggies prevents this reaction when frozen. Is it worth it? I think so. Although if you are in a pinch and think you’ll use the veggies in the near future, then some veggies might be fine if they are simply chucked in the freezer.
Freezing beans:
1. Wash beans and cut off ends (cutting off ends is a preference based decision)
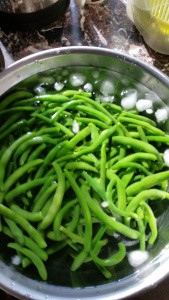
2. Place beans in boiling water for 2-3 minutes (tip – if you are using purple beans, take them out when then they turn green!)
3. Place beans in ice cold water (if you don’t have ice cubes, be sure to use cold tap water). This prevents the beans from over cooking.
4. After 5-8 minutes the beans should be cooled down and ready to remove from cold water
5. Air dry the beans, either by placing on a clean cloth or using a handy salad spinner. It’s okay if the beans aren’t totally dry, but avoid placing beans in the freezer when they still have lots of drips on them. This prevents freezer burn and beans from sticking together if you’d like to only take a certain amount of beans out at a time when you are ready to cook with them. I find it really useful to dry veggies like whole tomatoes before placing them in the freezer.
6. Place beans in a freezer safe and air tight container (ziplock bag, yogurt containers, etc). Remove as much as much air as possible from freezer bags. You can use a food vacuum sealer, or try a nifty trick one of the participants showed us using a straw to suck out the air (see photo below).
Beans should last 8+ months in the freezer.


Freezing Herbs:
Freezing herbs is new to me. I typically dry most of my herbs for winter cooking and teas. It’s easy, doesn’t take up freezer space, and I like to see my herbs neatly lined up on my shelf! Last year my family member who was a long time chef recommended freezing my herbs instead. His reason: the difference in flavour is ten-fold. Since then I also learned that some of the essential oils in herbs are better preserved when frozen. I admit I am in the process of drying some herbs or teas and cooking (they are still great for cooking), but I also have basil and other herbs in the freezer ready to go for garnish on foods and pesto.
There are a few different approaches to freezing herbs out there, and many have to do with preference. We experimented with two ways to freeze herbs:
Rolling herbs in parchment or wax paper:
1. Gently wash and dry herbs, and break off the leaves or leave stems on – up to you!
2. Place herbs in parchment paper and avoid overlapping herbs
3. Role the parchment paper tightly with herbs, and place it in a freezer bag – voila!
When you are ready to use the herbs, simply unroll the paper as you need herbs.


Freezing herbs in ice cube trays with oil (This is my favourite!)
1. Chop herbs
2. Place herbs in ice cube trays
3. Pour oil over the herbs and freeze (you can use melted butter too. Water is also an option, but this doesn’t keep the flavor as well and oil is great for throwing right in a pan for cooking)
4. You can leave the herbs in the ice cube trays, or place the ice cubes in a separate container.
You can also blend the herbs with oil and pour this mixture in the ice cube trays. I find the above way to be the quickest. Depending on how much herbs are in each ice cube tray, this is typically enough for one serving of soup, pasta, etc, to make a tasty difference to your meal. You might need a couple of the smaller ice cubes per serving (like the ones below). If you are concerned with your herbs changing colour when frozen (e.g., basil will turn black), then you can also blanch some herbs for a very short period of time before freezing. I typically skip this step.


Enjoy!
Jen Organ, Community Food Programmer with the EAC
Additional Resources:
You Can Too! Canning, Pickling, and Preserving the Maritime Harvest by Elizabeth Pierce (book).
National Centre for Home Food Preservation: http://nchfp.uga.edu/how/freeze/blanching.html
Both of the above resources include specifics on blanching times for different vegetables.
![]()
![]()

