Mushrooms! They are such fantastical life forms, evoking thoughts of fairies and fairy rings with deeply entrenched folklore. Or smurfs.
I will do you all a favour and avoid punny reference to “fun guys” but once you try your hand at growing them, you may find that they are quite the little charmers!
Mushrooms are the fruiting body of fungus. Now “fungus” does not bring up such cute mental images, but there is even a lot of exciting work in the use of fungus, for things like medicine, bioremediation, and even use in natural fabrics and building materials!
They can be used to make mushroom based building materials that are stronger than concrete, have more insulating power than fiberglass, and are completely compostable. The mycelium is “grown” within a mold of whatever shape is desired (bricks, or other building components). A funky little video of the process can be viewed at Mycoworks. If you want to take a deeper look at this, Planet Save has a great article with a video.
Did you know that the largest organism in the world is a mushroom? In eastern Oregon, there is a 2000 year old, 2200 acre mat of mycelium. Impressed yet? Impressed enough to want to grow some?
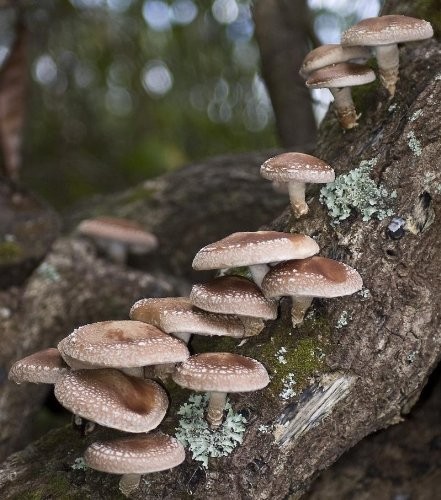
There are several types of mushrooms that can be grown at home, but the most popular seem to be oyster and shiitake mushrooms. I decided to focus on my favorite of the two. Shiitake. I can taste them already… imparting their earthy richness to noodle dishes, grounding my stir-fries with their meaty texture, bobbing around in my miso soup…
Shiitakes are commonly cultivated on logs. They are a great start to backyard farming in urban or rural settings, because they don’t require earthwork, and they are more than happy with a shady, forgotten corner of your yard.
Here are the steps I went through on the two occasions that I started a set of shiitake logs:
Step 1. Source your shiitake spawn. Some suppliers will actually sell you kitchen sized grow kits. If this is more your speed, check out Bay of Fungi in Sackville, NB. I live in Cape Breton, where Iris Vaisman of Bee Happy Farm will sell you a pre-inoculated log for your backyard. But if you are ready to get your farmer on…
Hunt down some spawn! I used the same supplier both times: MycoSource It is important to remember that there are different strains of shiitake, so going with a supplier that serves your climatic zone is important. Tell them where you live, and confirm that the strain they offer will work for you.
The first time I ordered from Mycosource, they sold their spawn in plug sheets. It was a large plastic sheet with little cylindrical cavities filled with spawn, each capped with a disk of Styrofoam. These plugs were incredibly easy to work with.
The second time I ordered from them (this year), all they had available was the old school spawn. This more traditional method, starts with a bag of inoculated sawdust. It looks like a giant mushroom itself, all webbed with white mycelium. This method was more time consuming, but like other food and farming traditions, there was something lovely about doing it the way it has always been done. Nothing fancy. Either way, order them in the winter, for spring shipment. If you are using the traditional method, you may also want to order a tool for pushing the spawn into the holes, and some cheese wax for sealing the holes, unless you’d rather source these locally.
When deciding how many logs you want to inoculate (therefore, how much spawn to order), consider that a 4 foot log, around 5” in diameter, will yield 0.25-0.5lbs mushrooms per flush, and you will likely get 3-4 flushes in a season if you are forcing).
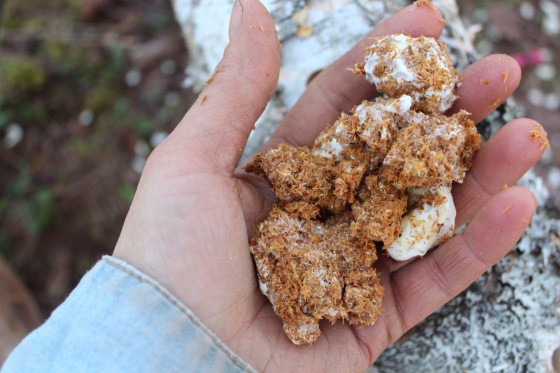
Shiitake mushroom spawn. This is basically a bunch of sawdust that has been sterilized and inoculated. Look at the beautiful white mycellium!
Step 2. Source your logs. Oak is the best. According to all literature, oak is what you want for shiitake, but most hardwoods will do the trick. My advice is to use what is available. Here in Cape Breton, oaks are scarce. Other recommended species include sugar maple, hornbeam, beech, and birch. I even saw alder on the list. I am skeptical about that one…up here; alder is just a junk tree that moves in when pastures are left to die. They are short-lived and not very robust. I decided to try a couple anyway. Why not? The first time I inoculated logs (around 5 years ago) I was living in Stewiacke, NS, where oak were easier to come by. I still have some of those logs and they fruit sporadically. This time I used birch, because birch is what I have. I read that they don’t last as long as oak. More like 3 years. We shall see! Species not recommended for various reasons: white ash, soft hardwoods (like aspen), evergreens, and fruitwood.
Don’t go longer than 4 feet in length for your logs. The main reason for this is manageability. They can get pretty heavy, especially when they are wet. You want the logs to be between 4-6 inches in diameter. Too wide and they get too heavy. Too narrow, and they dry out too quickly.
You want to cut the logs fresh in the winter while the sap is not flowing. This is thought to result in “tighter” bark (and bark retention is key to success and lifespan of your mushroom logs). You cannot use old, fallen wood. It is likely to be contaminated, or too dry. Remember that the wood will be home and food for your mushrooms. The sapwood will nourish the mycelium, and the bark will protect the home.

Pile of birch logs waiting to be inoculated
Step 3. Inoculation Time! Use the drill bit size recommended for your inoculation tool. I went ahead and ordered a bit from my spawn supplier because it had a built in depth stop. This made inoculating our 50 logs much more efficient. For a few home logs, you could spare yourself the added expense and just use any drill bit of the correct diameter. You need to drill holes 1 1/8” deep, 4-6” apart in a staggered diamond pattern of rows 2-3” apart. You don’t have to make your way around the entire log. We aimed for around 5 rows. Don’t wait to fill holes. You don’t want the wood drying out. Plug holes with spawn using inoculating tool, or some improvised ramming tool. Once filled, the holes need to be capped with cheese wax. Have this melted and ready. We just painted it on with a small, cheap paintbrush.
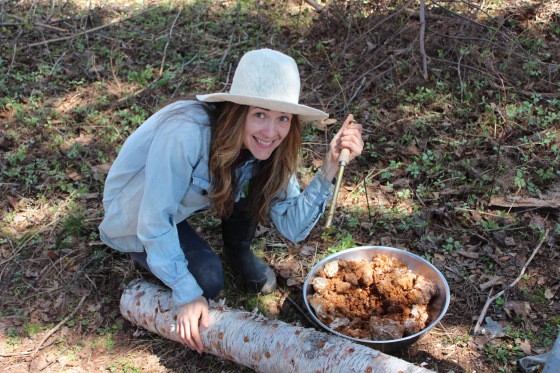
Time to fill the holes!


Once logs are all inoculated, stack them in such a way that they are not in direct contact with the earth. We placed ours on a pallet, in a log cabin formation.
The logs should be stacked in the shade, but make sure they are still exposed to rain, as you don’t want them drying out. Direct contact with the ground exposes logs to competing fungus, and the wetness can cause debarking, shortening the fruiting life of your logs.
Step 4. Wait. Like planting a fruit tree, mushroom logs do not offer instant return. The first year is called the spawn run. The shitake mycelium is setting up camp in your logs. You will see evidence of this as the season goes on – white “blooms” will appear at the ends of your logs. This is a good sign that it is working! If you aren’t getting a lot of rain during spawn run, you will want to water the logs with a sprinkler. Give them a good soak (3-4 hours) once per week. This extra love could result in a fall fruiting in the first year, but typically you won’t see a flush until the next year.
Step 5. Mushrooms! You and your precious logs have survived the winter. Yay! Now get them ready for their first fruiting season. Rearrange them (perhaps leaning against trees) in such a way that when the mushrooms erupt from the inoculation sites, they will do so uninhibited. The logs will fruit naturally around 2 times per season, but you can increase this frequency and the yield by coaxing them along a bit. Mushrooms respond to catastrophic weather, so dropping the logs is desirable. Seriously! Throw them around a bit. This is thought to simulate lightning strike. Soaking the logs in cold water (like in an old tub of some sort) for about 12 hours emulates a good rainstorm. At this stage, intermittent sprinkling is not effective. It can lead to debarking. Around 1-2 weeks after soaking, mushrooms will start to “pin”. Keep an eye on them! The slugs love them, so you will want to get to them first. Wood ash scattered around the base of the logs might help. You could also try beer traps or ducks. Don’t pick the mushrooms immediately – let them size up a bit, but pick before the head starts to curl back. Forcing your logs can result in 3-4 flushes per year, with some rest time in between. If you have multiple sets of logs that you shock in a staggered schedule, you can have a pretty continual harvest.
Step 6. Feast! Ok, this one seems pretty easy, right? You may end up with more shiitake than you can handle at a time, so explore preserving options. Some people like to dehydrate them in a tabletop dehydrator unit. This is a good way to use the ugly ones (over-ripe, slug-eaten, buggy…) I find this very time consuming, so prefer to fry them in copious amounts of butter and freeze them. The fat in the butter seems to help prolong their freezer life. I would offer some recipes, but honestly, they are just delicious in everything
Happy growing!
Further reading:
http://www.uvm.edu/~susagctr/resources/ShiitakeGuide.pdf
https://adventuresinlocalfood.wordpress.com/2014/03/20/home-scale-mushroom-production/
http://smallfarmcanada.ca/2010/talking-shiitakes/
http://www.wyliemycologicals.ca
Jody Nelson is the Community Food Coordinator for Cape Breton with the Our Food Project of the Ecology Action Centre.
Adventures in Local Food is your source for food news in Nova Scotia, from pickles to policy. It is a project organized by the Ecology Action Centre
Learn more about our program at https://www.ecologyaction.ca/ourfood
Or follow us on Twitter: @OurFoodProject
Facebook: The Ecology Action Centre

![]()