It’s garlic season! My favorite time of year. Below are some basics to get started on growing, harvesting, and storing your own garlic. Garlic adds a punch to meals year-round, has strong medicinal qualities (great for preventing colds!), and is so easy to grow! Plus – growing garlic can be a big money saver as you begin to build your own garlic supply.
1. Choosing your garlic
Hardneck vs. Softneck Garlic
Hardneck garlic have a few large cloves in each bulb, and tend to weather our maritime winter the best. They also produce a large stem that grows up through the center, known as the garlic scape. This is where the name ‘hardneck’ comes from.
Softneck garlic have many small cloves in each bulb. They don’t grow garlic scapes, nor do they tend to grow as well as hardneck garlic in our climate.


Where to Source?
You can source garlic from garden centers and seed companies (Halifax Seed, Vessey’s Seed, Hope Seed), from a friend who saved their garlic from last year, or at local garlic festivals like the Avondale Garlic Festival. Don’t forget that many garlic varieties sold at the farmers markets are also great for planting.
2. Planting Garlic
Plant garlic in the fall around the Thanksgiving long weekend, approximately 4-6 weeks before the ground is expected to freeze. They will overwinter and begin to poke through the soil early spring. Cover your garden with mulch where possible to help insulate the soil, retain moisture, and prevent weeds. Some garlic varieties can also be planted early spring, however fall planting generally has more success.
Planting is easy! Take a clove from a garlic bulb and place it approx. 1-2″ beneath the soil with the pointy side up. Space each clove approximately four to eight inches apart. Don’t peel the skin from the cloves, and don’t separate the cloves until the day of planting. Garlic is one of my favorite things to grow because it requires very little maintenance. Just let them do their thing!

3. Garlic Scapes
Garlic scapes grow from hardneck garlic and are delicious. They can be harvested once the scapes begin to curl at the top – typically by early July. Cut near the bottom of the scape and cook or preserve as you like. Scapes can be used right away for cooking, or frozen or pickled for winter treats. Harvesting the scapes directs more energy to the garlic bulb making them larger.


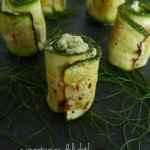
Garlic Scape Pesto Recipe (From Eating By the Seasons)
2 cups fresh basil leaves (you can also try arugula or nasturtium leaves!)
1/4 cup pine nuts, walnuts or toasted sunflower seeds
1 tsp salt
1/3 cup olive oil
1/2 cup Parmesan, swiss, pecorino or Romano cheese, gratedIn a food processor, combine all the ingredients except the cheese. Process the mixture in short bursts. If it’s too oily, add more basil. If it’s too dry, add more oil. Add grated cheese last or just before serving.
4. Harvesting Garlic
A couple weeks after garlic scapes have been harvested the green leaves should begin to brown. Harvest the garlic once the bottom three leaves or approximately ¾ of the greens are brown. Use a garden fork to gently remove the soil surrounding the bulb, bringing the garlic up with it. Bring the bulbs inside to dry in a shady room with good airflow. Use caution when handling fresh garlic – although they don’t look like it at this stage, they are fragile and can bruise easily.


5. Curing Garlic
Curing garlic is great for long term storage of garlic if you don’t want to use it right away. Cutting the stems are optional. Some people like to keep the leafy bits to braid their garlic once they are cured. If you cut the stems, leave about 3-4”. It should take approximately 4-6 weeks for garlic to dry. How do you know when their ready for storage? Cut approximately 1-2” inch above the bulb. If it’s moist it needs more time to dry.
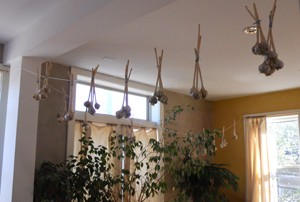
Garlic drying in the old EAC board room
6. Storing garlic
Once dry, dust off any remaining dirt and store on a cool, dry, and dark place (not your fridge!). Save a few of the biggest nicest looking bulbs for planting in October, and start all over again!
Happy garlic,
~Jen Organ is the Community Food Programmer with the Our Food Project of the Ecology Action Centre.
Adventures in Local Food is your source for food news in Nova Scotia, from pickles to policy. It is a project organized by the Ecology Action Centre. Learn more about our program at https://www.ecologyaction.ca/ourfood. Follow us on Twitter @ourfoodproject.

![]()