This is also the time to do two coats of liquid latex around your nail and let it dry. Don”t let your fingers touch or the latex will stick together! 3. Paint on the base color. I always choose the lightest of the colors in my gradient, so this time I chose the pink. 4. Using a makeup sponge, paint the gradient colors in lines. I like to make sure the polish on the sponge is about the same size as my nail. 5. Dab the sponge onto your nail a few times. Don”t do this too much because the polish will start to come off. If you don”t get the polish to be opaque enough after the first time, go back and do it again after it has had a few minutes to dry. 6. Using tweezers, remove your liquid latex! This will also remove the mess of polish that isn”t on your nail. If you still have polish left on your skin, use a small brush dipped in polish remover to clean it up. 7. Grab a very small brush. I bought this one at Michaels. 8. Paint 3 dots with white polish where you want your chevron lines to go. There are two small dots near my cuticles, and one at the very top of the free edge. 9. Connect the dots using your white polish. After letting this all dry for a few minutes, you can add your top coat to seal in your nail art.” width=”640″ height=”640″>
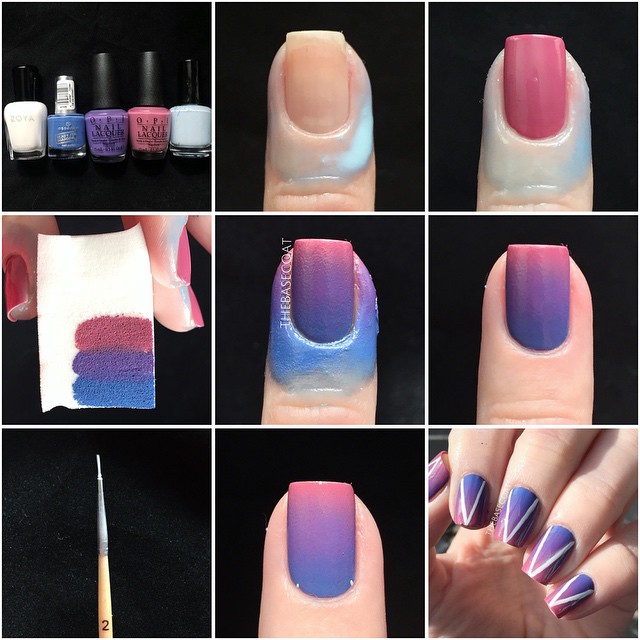
1. Gather your polishes! I like to have my bottles opened before I start. For this look, I used an opaque white, pink, purple, blue, and liquid latex.
2. Paint on your base coat. This is also the time to do two coats of liquid latex around your nail and let it dry. Don’t let your fingers touch or the latex will stick together!
3. Paint on the base color. I always choose the lightest of the colors in my gradient, so this time I chose the pink.
4. Using a makeup sponge, paint the gradient colors in lines. I like to make sure the polish on the sponge is about the same size as my nail.
5. Dab the sponge onto your nail a few times. Don’t do this too much because the polish will start to come off. If you don’t get the polish to be opaque enough after the first time, go back and do it again after it has had a few minutes to dry.
6. Using tweezers, remove your liquid latex! This will also remove the mess of polish that isn’t on your nail. If you still have polish left on your skin, use a small brush dipped in polish remover to clean it up.
7. Grab a very small brush. I bought this one at Michaels.
8. Paint 3 dots with white polish where you want your chevron lines to go. There are two small dots near my cuticles, and one at the very top of the free edge.
9. Connect the dots using your white polish. After letting this all dry for a few minutes, you can add your top coat to seal in your nail art.
See my post from yesterday for a larger image of the completed look!